We Run Sales-Led Marketing. So Why Are We Running CTV?
The case for testing CTV is straightforward: same targeting data as existing campaigns, premium placement, and a channel where your audience is spending more time.
Read More

Shopify provides a great platform for setting up an e-commerce store and getting started with product sales. However, attracting new visitors to your store can prove challenging.
Fortunately, Shopify integrates well with Facebook Ads. Facebook Ads lets you show off your products across Instagram, Facebook, Messenger, and WhatsApp. The complexity and options that Facebook Ads Manager offers can seem daunting at first, but AdRoll's Facebook ad management tool can provide guidance that will streamline your efforts significantly. If you want to skip the whole process and manage all the ads and email for your Shopify store in one place, AdRoll offers a platform for just that. Use this article as a reference, and feel free to skip directly to relevant sections for your situation:
You need a Facebook business page before you get started with advertising. Essentially, you only need a business name and description, two photos, and a call-to-action (CTA) button. You can likely just copy from your Shopify store, so find the basic instructions and page creation prompt here. Your ad account sets up automatically when you create a business page. The link for Ads Manager shows up in your Facebook sidebar, or you can likely just follow this link and select the correct business account in the upper left.
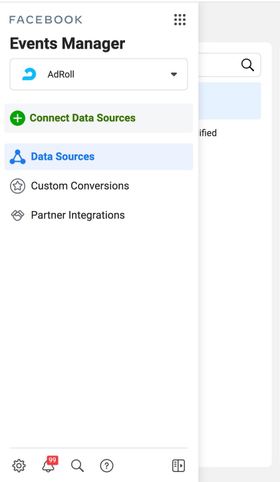
Your Facebook Pixel is a code you can put on your website to measure how well your ads perform based on audience behavior on your site. Create and install your Facebook Pixel to enable conversion reporting and algorithmic ad optimization. Creating your Facebook Pixel code is easy — navigate to your Events Manager, click the "Connect Data Sources" button (which should be a white plus within a green circle), and then name your Pixel and enter your website URL. Make sure you copy your Facebook Pixel ID once it loads so you can paste it into the field within your Shopify store.
Your Facebook Pixel code should be placed into the header code of your website above the </head> tag. You must paste the code in the header of every page or into your header template. If your Facebook Pixel isn’t properly loaded, you won’t be able to track conversions, so it’s vital that you don’t skip this step.
Now, open the admin page in your Shopify store. Under "Online Store," navigate to "Preferences." In the Facebook Pixel section, enter your Pixel ID and click save.
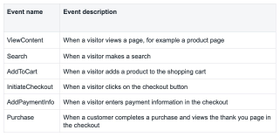
This direct integration between Facebook and Shopify automatically tracks six different events, plus each purchase's value. You can create campaigns that Facebook optimizes toward a specific event. After you collect enough sales volume, you can later optimize toward ROI. The six events that the pixel tracks include:
The Shopify integration makes it easy to import your existing products to promote and sell with Facebook. To import your existing products, go to your Shopify admin page and:
Click the "+" symbol next to Sales channels
Click "Learn more" next to the Facebook channel
Click "Add channel"
Select Facebook and click "Get started"
Click "Connect account" and allow Shopify to connect to your business Facebook page
Now you can enable Facebook checkout. This completes the upload of your Shopify products to Facebook. Use these imported products to create ads in the different formats detailed below.
Start campaign creation in Facebook Ads Manager by clicking on "+ Create" and picking a buying type and objective. If you want to sell products and optimize toward more sales, you should select the "Auction" buying type. Facebook offers many advertising campaign objectives, but "Conversions" or "Catalog sales" work best for Shopify sales.
If you want to use product images you imported into a Facebook Catalog from your Shopify store, choose the "Catalog sales" objective. If you want to use images made specifically for Facebook Ads, then select "Conversions." If you decide to use an AdRoll account for your Facebook Advertising, you do not need to choose. The machine learning algorithm will simply optimize traffic toward your purchase conversions.
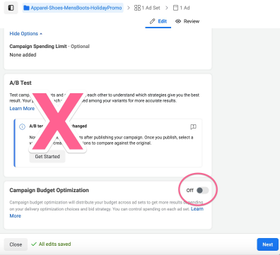
Once you choose an objective, you can give your campaign a name in the "Campaign edit" tab. Make it descriptive so you can determine its contents at a glance. Consider creating a naming convention you can repeat with additional campaigns. You can use something like Apparel-Shoes-MensBoots-HolidayPromo.
That campaign name contains a product category, sub-category, specific product, and a specific deal. This title is for demonstration, but you can come up with something relevant to your business.
The "Campaign Budget Optimization" toggle in the campaign tab shifts budget control between campaign level and ad set level. "Off" means setting budgets at the ad set level, while "On" means a campaign-level budget which Facebook distributes among ad sets based on performance. Campaign level often allocates most of your budget to the ad set with the largest target audience. For the moment, you can avoid turning the A/B test option and create your ad set.
Ad sets handle three functions if you opt-out of "Campaign Budget Optimization." They manage budgets, they contain your ads, and they control ad targeting. If this is your first ad campaign, then you likely do not have any "custom audiences" — you can leave this field blank. If you plan to continue with Facebook Ads, then later, you should create audiences for site visitors and users that complete actions like "Add to Cart" and "Purchase."
Give your ad sets descriptive titles. Perhaps choose a name that relates to your targeting strategy and differentiates between ad sets within a campaign.
Ad set targeting requires configuring four elements:
Geographic location
User demographics
User interests or behaviors
Placement
The Facebook Ad set edit panel shows a helpful "Audience Definition" widget that dynamically updates the estimated potential audience size your ads may reach as you change settings.
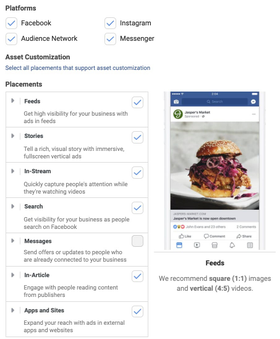
Choose the "Platforms" and "Placements" you want your ad to run on based on product and audience. You can choose from several options, but the main placements include:
Instagram feed: Only shown to mobile users, your ads will be nested between organic posts from accounts that a shopper follows.
Facebook feed: Shown to both desktop and mobile users, your ads will appear next to posts from shoppers’ friends.
The right column of Facebook: These ads are only shown to desktop users.
Messenger inbox: Your ad will appear in the Home tab.
Instagram Stories: Your ads will be shown in between Stories from shoppers’ followed accounts.
Do your potential and existing customers spend more time on Facebook or Instagram? Do you want as much reach as possible, or will your ads seem out of place on mobile apps? If you want to avoid mobile apps, remove the "Audience Network" placement. If your ad takes some explaining, then "Facebook Newsfeed" may work, while a self-explanatory image is perfect for Instagram.
For more information about Facebook ad placements, check out this Best Facebook Ad Placement Guide.
Consider why Facebook or Instagram users might be interested in your product. Use the "Detailed Targeting" field in the ad set settings to find interests that are similar to those or are similar to your product so that your audience is more likely to engage with your ad. You can also use the Audience Insights tool to see the interests of the people who like your page and expand on those. Just be careful that the majority of that audience is not your company's employees.
If you have user data on existing customers, you can upload a list to Facebook Audiences and create a lookalike audience of users that share similar interests to your customers. You can overlay a lookalike audience on interest targeting to zoom in on quality potential customers. Beware that higher specificity may increase your CPM, but if your CTR and conversion rate increase, then it works out.
Set some of your budget aside to show ads to visitors who leave your site without making a purchase — especially those who added items to a cart then abandoned it (you can find out more about abandoned cart recovery here). Create audiences to target from site visitors or visits to specific pages, and match those users' browsing behavior to the message and image in your ad. For instance, if a user visited a shoe section of your website, show them images of shoes. If they shopped for belts, show them belt photos. Additionally, you can show ads to customers who purchased products that complement their purchase. If a customer purchased pants, you could show them ads for belts!
For more information about retarget website visitors on social networks, check out this Social Media Retargeting Strategies Guide.
Ad creatives with high-quality photography make your products look good so that you're more likely to sell products. Facebook and Instagram scroll through photos and posts by friends, so your ads need to grab enough attention to interrupt scrolling.
Make sure you satisfy the basic specifications for Facebook Ad images. Newsfeed accepts images in aspect ratios of both 1.91:1 and 1:1. Try both sizes and let the algorithm determine the better performer. Facebook no longer requires less than 20% of an image covered in text, but try to follow the rule anyway since viewers engage less with images covered in text. You can still make use of the text fields available to you.
You can take advantage of catalogs and lower your effort by importing images from your Shopify store. Recommendations for a high engagement image apply across ads and store product listings:
Put your product in your ad if you sell physical products. The most engaging images feature your product in active use.
Choose high-resolution images with bright lighting and high contrast colors.
Keep image backgrounds simple to maintain the focus on your products.
Limit distractions by keeping text on your image to a minimum.
Avoid using stock photography.
Creative elements increase viewers' motivation to engage with an ad. If you promote a straight-forward, easy-to-understand product, incorporate novel or unusual creative elements. If your product requires explanation, try elaborative creativity. Depending on your brand, you may just forego the creativity and make your images as attractive and eye-catching as possible. On top of these recommendations, emotional elements in an image or message help performance. Users react more favorably to a persuasive message if it contains a more significant emotional appeal.
There are numerous ad formats available to brands, but some popular types include:
Social proof ad: Include glowing customer reviews, testimonials, or any accolades (e.g., awards from publications) to immediately boost social proof.
Influencer ad: Feature an influencer in your ad to better grab attention and enter new markets in a more relatable way.
Dynamic ad: By using images of products that a shopper has already clicked on or has otherwise shown an interest in, you’re upping the chances that your ad will be relevant to their needs.
Video ad: Video ads are fantastic for increasing brand awareness or telling a longer story as part of a larger campaign.
Plan to link purchases on your Shopify store back to specific campaigns and ads. Facebook provides a field in each ad where you can set tracking up easily. At the bottom of your ad settings, under "Tracking," you will find a "URL Parameters" field. You can set up URL parameters that will show up in analytics data for your site.
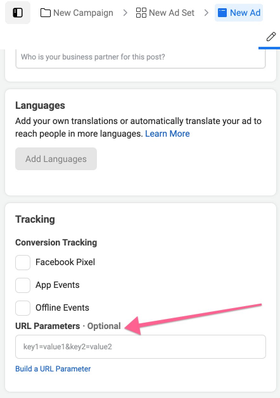
Facebook provides functionality for inserting dynamic url values that will insert the names of placement, campaign, ad set and ad. The options Facebook provides are:
{{placement}}
{{campaign.name}}
{{adset.name}}
{{ad.name}}
{{campaign.id}}
{{adset.id}}
{{ad.id}}
You can set it up however you want to track values, but this example provides a good start:
utm_source=facebook&utm_medium={{placement}}&utm_campaign={{campaign.name}}&utm_content={{ad.name}}&utm_term={{adset.name}}Placement shows where the ad appeared, i.e. the desktop feed, mobile feed, the right column of Facebook, the Messenger inbox, or within the Instagram Feed or Instagram Stories. The other parameters are self-explanatory. This field allows you to select all of your ads, edit all of them, and insert the string into all of them at once.
After your ads run for a little while, you can start looking at Facebook's metrics in the platform. The main goal is a lower cost per purchase than revenue per purchase. However, other metrics help diagnose your ads' quality and effectiveness on the way to that goal. CPM is not an end metric in the same way as cost-per-purchase, but you can use changes over time and differences between ads or ad sets as a symptom to check on things like poor creative, targeting that is too focused, high frequency of ad views or low engagement. If your CPM spikes over a certain period, try to figure out whether a change in one of those factors corresponds to the spike.
Click-through rate (CTR) and engagement rate are measures of engagement that help determine how viewers react to your ads. Low CTR could be an issue with either the relevance of your targeting or with the quality of your creatives. Higher engagement with an ad makes Facebook's algorithm give the ad greater reach at somewhat lower costs. It is in your best interest to iterate on your targeting and ads to achieve the best possible engagement with your ads.
Use the "Breakdown" dropdown menu generously.
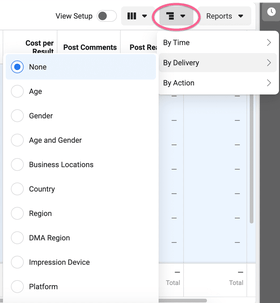
Check on the location segments to make sure you set up your location targeting correctly and that your ads spend on different regions as you expected. Check on the platforms segment often. Different platforms carry different engagement rates, and people will treat an ad differently across Facebook and Instagram. Ensure that one platform is not cannibalizing all of your ad spend if you wanted delivery across placements. If this becomes a problem, you can split your ad set out to target platforms individually while controlling specific budgets for each. Facebook makes plenty more segments available so explore for yourself.
The amount of setup and strategy required to start with Facebook Ads may seem daunting at first, but hopefully, this guide helps you break the process down into steps and get your ads up and running successfully.
But the work doesn’t end here: While Facebook remains the champion of social media, standalone Facebook ads are not enough to grab attention and increase sales in today’s competitive ecommerce landscape. Recent changes in iOS and other platforms to improve privacy protection for consumers also affected Facebook Ads’ performance. Brands must now take a cross-channel approach to build brand awareness, retarget shoppers, and boost conversion rate — it’s the only way to address shoppers’ shift to a more holistic purchasing journey spanning multiple touchpoints.
Learn more about how to get started with cross-channel marketing with AdRoll Marketing Recipes. Good luck launching your ads and growing your Shopify store!
Last updated on April 5th, 2023.