AdRoll vs. The Trade Desk: Comparing Pricing, Features, and Benefits of Two Top DSPs
AdRoll and the Trade Desk compete head-to-head on many features. Our guide covers DTC advertising, ecommerce, ABM, privacy, channel coverage, and pricing.
Read More

Did you know that 22% of returns are due to products looking different in person compared to listing photos? That’s just one of the many testaments to how crucial product images are for ecommerce sales. The challenge? Even the most seasoned ecommerce pros know how tricky it can be to achieve attractive and accurate product photography.
Contrary to what some new marketers may think, you don’t need a massive budget and roster of photographers to take enticing images for your website. Whether your goal is product or lifestyle images (or ideally, a mix of both!) for ads, product pages, and promotional emails, you can easily create amazing ones with just an iPhone. All it takes is a bit of planning, creativity, and this handy checklist chock-full of expert tips.
Product and lifestyle images are the two main types of product photography commonly found on product pages and across marketing platforms.
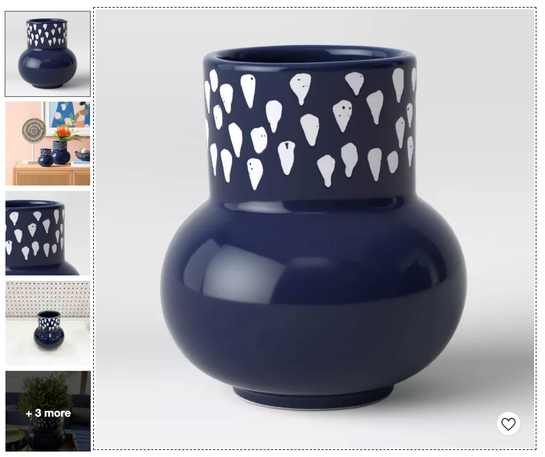
Product images are typically “clean,” meaning they have white backgrounds and little else beyond the product. They help create a consistent visual feeling throughout your product line when people click to browse.
Comparatively, lifestyle images show your product in action — whether it’s in an environment or context that it’s typically used in or alongside products that complement it. With more creative freedom, lifestyle shots are great for storytelling, helping shoppers envision themselves using your product.
We recommend a mix of product and lifestyle images for every product page.
Good news for product photography DIY-ers: While having a proper setup is important, expensive equipment is not essential when it comes to great product photography. Instead, some things you’ll need are:
✅ A camera — if you have a DSLR, great. If not, a smartphone will work just fine
✅ A tripod
✅ A white background — this can be poster board or a white sheet
✅ White foam board bounce cards to help you reflect light into the shadows
✅ A table
✅ Tape to secure your bounce cards
✅ A well-lit room with natural light
✅ Create a shot list. To make sure you cover all your bases, create a list of all the products you need to photograph, as well as any special details or requirements associated with it.
✅ Set up your table as close to the window as possible. Remember: Your goal is soft light. Don’t forget to turn off all the other lights in the room.
✅ Place your product in the middle of your shooting area, which can either be a white sheet or roll of craft paper that falls naturally to the ground. You want a seamless transition between the vertical and horizontal planes.
✅ Set up your camera on a tripod.
✅ If you’re using a DSLR, adjust your camera so the:
White balance is “auto”
Flash is off
Image settings are at the highest quality possible
The aperture is small (f8 or f11)
ISO is set to 100
✅ Put up the reflector card (that’s your foam board). Experiment with different angles to see how the light fills in the shadows.
✅ Take your picture, then upload it to your computer for review. This will be more accurate than evaluating your shots directly in the camera.
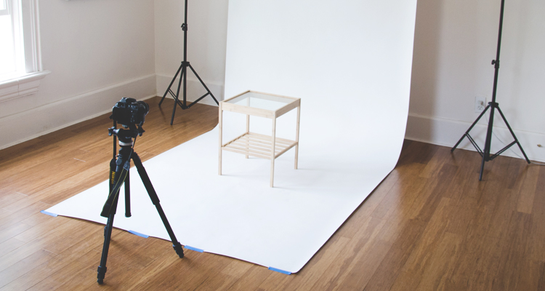
An example of a basic DIY product photography setup. Source
Never shoot in direct sunlight! This will create harsh shadows that are difficult to retouch later on.
Shoot multiple angles — you want shoppers to see each product from different perspectives. Similarly, take close-up shots of your products to show unique features.
Don’t move your camera and tripod during the shoot. Instead, rotate the product as necessary.
Don’t use a wide-angle lens, as that will distort your product.
If you don’t have a tripod, use a stool or a pile of books to keep your camera in place.
✅ Determine the best context for each product. Ask yourself:
Who is your target audience?
How will the product be used?
Where will it be used?
Are there other items that should belong with this product?
✅ Do a location scout. For example, if you’re selling sunscreen, you might want to find a nearby pool or a beach that’ll serve as an appropriate and believable background.
✅ Gather your props, which should feel complementary to your product when it comes to style, theme, color, and texture.
✅ On the day of your shoot, unleash your creativity when staging your scenes. Lifestyle shots are all about being aspirational and inviting in a way that draws in shoppers. Keep in mind:
You want to limit the number of items in the frame to avoid taking attention away from your main product.
Your product should be front and center in terms of both placement, size, and color.
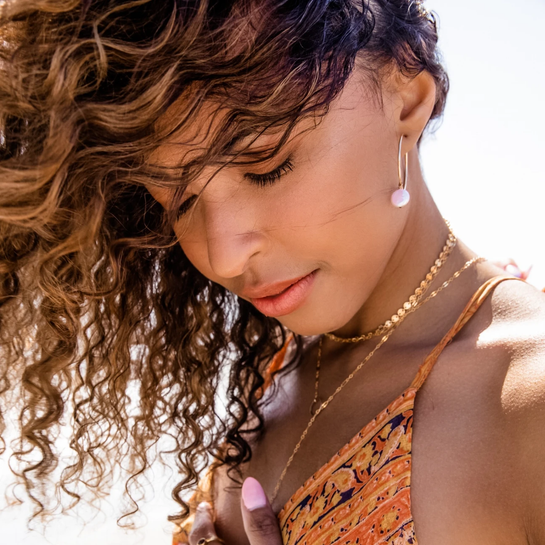
A beautiful lifestyle photo from Payton Jewelry .
For the best natural light, shoot early in the morning or late in the afternoon. Remember: More sunlight is always better than not enough sunlight.
Use tape, blue tack, or glue dots to fix small items in place.
Don’t be afraid to experiment with different layouts. For instance, if you’re shooting apparel, you can try using mannequins, flat lays, or hangers.
No matter how good of a photographer you are, image retouching is a necessary step to making your images website-worthy. For amateurs, editing can be a bit of trial and error, but thanks to product photography editing software, such as Canva, it’s gotten a lot easier over the years.
Here are some pro tips to remember when retouching:
Check that your horizon is straight.
Crop any excess space as necessary.
Play with the vibrancy, saturation, contrast, and exposure so that the colors pop while still looking realistic.
Create a technical guide or a template in your software so that you can maintain a consistent look for each product you edit.
Having amazing lifestyle and product photography not only boosts the perceived value and quality of your product but also builds your brand identity. And with these tips, you’ll be cranking out fantastic product photography in no time.
Looking for more ways to deliver an amazing ecommerce experience? Check out the AdRoll app for Shopify today!
Last updated on December 13th, 2024.